MBS Plugin Advent calendar

Door 19 - RegEx

Fact of the day
Regular expressions originally come from mathematics. In 1951, the mathematician Stephen Kleene wrote events similar to today's RegEx.

You want to search for mail addresses in a text and extract only these addresses from the text. Or do you want to replace all Internet addresses in a text with a new Internet address of your own? In this case, regular expressions are a good solution for this task. What regular expressions are and how you can use them in FileMaker I will show you in this Door.

What are regular expressions?

With regular expressions you can search for certain patterns in a text or check a string if it meets certain criteria, e.g. if the chosen password contains upper and lower case letters, at least one number, one special character and is at least 8 characters long. If we search for something in a text search then we actually always search for a regular expression. For example, if we enter the word "Miss", then we search for a pattern in the text that searches for the letters M-i-s-s that stand behind each other. We find the word Miss but also the word Mississippi and if we tell the program that we don't care about upper and lower case letters we also find the word missed. So we are looking for a pattern where the 4 letters appear exactly in this order. This is already a regular expression. But now we can build it even further. E.g. for a mail address that the local part is separated from the domain with an @ sign. After the Domain is the Domaintail separated by a dot. abc@xyz.com but also a2x4y@abc.de are valid mailaddresses. We now want to develop a regular expression that finds both mail addresses in one text. So we have to formulate how the pattern looks like. The local part can be composed of upper and lower case letters, numbers and the characters .!#$%&'*+-/=?^_`{|}~ the string has no fixed length. Let's see how to define something like this. If we specify a range from which a character can be taken, we write the characters in square brackets. In this example, all characters that are an a, b or c would be found.

[abc]

If we now want the character we are looking for to be any lowercase letter, we do not have to list all 26 letters but can also write [a-z] instead of the list. The dash will then not be found because it only acts as an indicator for a range. If we want that also capital letters are found, we enter [A-Za-z]. If we want the numbers 0-9 to be found, we add [A-Za-z0-9]. We can add to this any character. If we define the range for the local part of the mail it looks like this [a-zA-Z0-9.!#$%&'*+-/=?^_`{|}~].

If we now specify this as a regular expression, exactly one character would always be found that is contained in this set. To indicate that these characters can occur several times in a row we have different possibilities. First we can use the star, which indicates that a character can occur any number of times. With [a-z]* we could find a string of lowercase letters of any length. But the star is not what we would choose for the mail address, because the star excludes that the string can have a length of 0. We want our local part to consist of at least one character. For this we have the + which should be behind the range. If we would have the condition that the string should consist of at least 3 and at most 20 characters, we could indicate this range also in curly brackets. [a-z]{3,20}. For three to infinity, we would simply remove the 20. So our definition for the local part would look like this [a-zA-Z0-9.!#$%&'*+-/=?^_`{|}~]+ now. We add an @ as separation between the local and domain part.

[a-zA-Z0-9.!#$%&'*+-/=?^_`{|}~]+@

Since the @ character should occur exactly once, we don't need a multiplicity here. The domain part has now again its own range definition, which characters can be taken and how many characters this part contains. Let's assume that we limit the character range to upper and lower case letters, numbers and the underline. For this range of characters there is already a predefined range called \w. Pay attention to the upper and lower case because \W means that it can be all characters except the characters just mentioned. So this is the negation. Since there should be at least 1 character here, too, it looks like this:

[a-zA-Z0-9.!#$%&'*+-/=?^_`{|}~]+@\w+

Now only the domain tail is missing. This can be .de, .com but also .info. That means we have a dot followed by 2-4 upper and lower case letters. Because the dot as such can be any character in a regular expression we have to escape it with a prefixed backslash if we really mean the dot character. Then follows the domain tail. The regular expression looks like this:

[a-zA-Z0-9.!#$%&'*+-/=?^_`{|}~]+@\w+.[a-zA-Z]{2,4}

If we now leave the regular expression as it is and our text contains, for example, the misspelled mail address xyz@abc.oinfo, then the text xyz@abc.oinf would be found because we have not specified that there is a word limit. We can specify this with \b before and after the expression.

\b[a-zA-Z0-9.!#$%&'*+-/=?^_`{|}~]+@\w+.[a-zA-Z]{2,4}\b

How to Implement this in FileMaker

Now we want to implement such a search in FileMaker. So that you can also create your own regex later, we create a field in FileMaker in which you write the regex expression (Search). A field in which we specify the text to be searched (Text), a field that specifies whether there were any matches at all in the text for the pattern (FindMatches), a field that specifies how many matches there are (MatchCount) and a field in which the matches are listed in a list (Catches).

With the RegEx.Match function, we first test whether there is at least one structure in the text that matches our pattern. If this is the case, the function returns a 1. In the parameters of this function, we start by entering the pattern, followed by the text we want to search. This is followed by the compiler options. Here we can specify further options for compiling. The following options are available here:

Compile option Number Description
Caseless 1 Do caseless matching
Multiline 2 ^ and $ match newlines within data
Dot All 4 . matches anything including NL
Extended 8 Ignore white space and # comments
Anchored 16 Force pattern anchoring
Dollar End Only 32 $ not to match newline at end
Ungreedy 512 Invert greediness of quantifiers
No Auto Capture 4096 Disable numbered capturing parentheses (named ones available)
Auto Callout 16384 Compile automatic callouts
FirstLine 262144 Force matching to be before newline
Dup Names 524288 Allow duplicate names for subpatterns
Newline CR 1048576 Set CR as the newline sequence
Newline LF 2097152 Set LF as the newline sequence
Newline CRLF 3145728 Set CRLF as the newline sequence
Newline Any 4194304 Recognize any Unicode newline sequence
Newline Any CRLF 5242880 Recognize CR, LF, and CRLF as newline sequences
BSR Any CRLF 8388608 \R matches only CR, LF, or CRLF
BSR Unicode 16777216 \R matches all Unicode line endings
JavaScript Compatible 33554432 JavaScript compatibility
No start optimize 67108864 Disable match-time start optimizations

If you want to combine these options, you can add the individual values together. In this example, we have selected the option 512 and 1. So we want our pattern evaluation to be Ungreedy, which means that we want the smallest possible match to be displayed and the 1 stands for the fact that we don't care about upper and lower case in the evaluation.

The function then has another parameter and this contains the options that we set for the execution. Here, too, we can choose from various values and combine them.

Execute option Number Description
Anchored 16 Force pattern anchoring
Not BOL 128 Subject string is not the beginning of a line
Not EOL 256 Subject string is not the end of a line
Not Empty 1024 An empty string is not a valid match
Partial 32768 Allow partial results.
Newline CR 1048576 Set CR as the newline sequence
Newline LF 2097152 Set LF as the newline sequence
Newline CRLF 3145728 Set CRLF as the newline sequence
Newline Any 4194304 Recognize any Unicode newline sequence
Newline Any CRLF 5242880 Recognize CR, LF, and CRLF as newline sequences
BSR Any CRLF 8388608 \R matches only CR, LF, or CRLF
BSR Unicode 16777216 \R matches all Unicode line endings
No start optimize 67108864 Disable match-time start optimizations
Partial Hard 134217728 Return partial result if found before .
Not Empty At Start 268435456 An empty string at the start of the subject is not a valid match
UCP 536870912 Use Unicode properties for \d, \w, etc.

In our case, we do not want to enter a specific value here and therefore enter a 0.

Set Field [ DoorNineteen::FindMatches ; MBS( "RegEx.Match"; 
	DoorNineteen::Search; DoorNineteen::Text; 512+1; 0 ) ] 

Now we also want to know what these hits look like. To do this, we first compile the pattern with the RegEx.Compile function. We pass our search pattern to the function and again the compiler options that we have seen above. The function gives us a reference of the pattern with which we can continue working in the RegEx.FindMatches function. This function returns a list with the results that have been found for the searched pattern.

Set Variable [ $regex ; Value: MBS("RegEx.Compile"; DoorNineteen::Search; 512+1) ] 
Set Variable [ $Match ; Value: MBS("RegEx.FindMatches"; $regex; DoorNineteen::Text; 0; 1) ] 
Set Field [ DoorNineteen::Catches ; $Match ]

Using this list, we can also use the ValueCount function in FileMaker to determine how many hits we have in the text.

Set Variable [ $count ; Value: ValueCount ( $Match ) ] 
Set Field [ DoorNineteen::MatchCount ; $count ] 

Last but not least, we need to release the references that we have created. We use ReleaseAll for this.

Not only can we search for the entries in a text, we can also replace them. For example, if you want to delete the mail addresses from the text for data protection reasons or replace them with a placeholder, we can use the RegEx.Replace and RegEx.ReplaceAll functions. With the RegEx.Replace function, we can replace individual hits by specifying the index, whereby RegEx.ReplaceAll replaces all hits. In this example, we have a field in which we can enter the text we want to replace all hits with. We then write the result text in a separate field.

Set Field [ DoorNineteen::Result ; MBS( "RegEx.ReplaceAll"; 
	DoorNineteen::Text; DoorNineteen::Search; DoorNineteen::Replace ) ] 

I hope you enjoyed this door too and we'll see you again tomorrow.

Door 20 - MapView

Fact of the day
The advantage of Apple Mapview is that you do not have a total quota of calls that are assigned to your app, but these calls apply per device and are therefore almost impossible to reach.

Did you know that you can use the map material from Apple Mapview on your Mac and iOS devices in FileMaker? I'll show you how it works in this door.

Show map with options

First of all, we want to display a map that we can then work with. Two functions are available to us for this purpose. One is MapView.CreateWithSize with which we can create the map in a window by specifying the position and size. We would like to use the second option MapView.CreateWithControl, because here we position the map with the help of a control. The control can be a rectangle, for example. We then give this control a name so that we can also address it. In our case Map. Then we call the function. First we specify the window reference. If the window is in the foreground, it is sufficient to enter a 0. Then the name of the control follows. If necessary, we can then specify an offset with X and Y. This is oriented to the top left corner of the control and causes the map to be shifted.

Set Variable [ $$MapView ; Value: MBS("MapView.CreateWithControl"; 0; "Map")

We can now go to the Exploration gate on the map. In the plugin we have some functions that can show and hide various options on the map. For example, you can display the outlines of buildings, traffic, points of interest such as places of interest and stores or your own position on the map. But also controls such as the compass, the scaling bar or the zoom controls can be displayed. We have a separate function for each of these properties. In our solution, we have now built in buttons with which you can switch these features on and off. For each feature there is also a field in the database that holds the current value for us. When creating the card, we switch all these properties off once and fill the corresponding fields with the value 0.

Set Variable [ $r ; Value: MBS("MapView.SetShowsBuildings"; $$MapView; 0) ] 
Set Field [ DoortTwenty::Buildings ; 0 ] 
# 
Set Variable [ $r ; Value: MBS("MapView.SetShowsTraffic"; $$MapView; 0) ] 
Set Field [ DoortTwenty::Traffic ; 0 ] 
# 
Set Variable [ $r ; Value: MBS("MapView.SetShowsPointsOfInterest"; $$MapView; 0) ] 
Set Field [ DoortTwenty::POI ; 0 ] 
# 
Set Variable [ $r ; Value: MBS("MapView.SetShowsUserLocation"; $$MapView; 0) ] 
Set Field [ DoortTwenty::UserLocation ; 0 ] 
# 
Set Variable [ $r ; Value: MBS("MapView.SetShowsCompass"; $$MapView; 0) ] 
Set Field [ DoortTwenty::Compass ; 0 ] 
# 
Set Variable [ $r ; Value: MBS("MapView.SetShowsScale"; $$MapView; 0) ] 
Set Field [ DoortTwenty::Scale ; 0 ] 
# 
Set Variable [ $r ; Value: MBS("MapView.SetShowsZoomControls"; $$MapView; 0) ] 
Set Field [ DoortTwenty::Zoom ; 0 ] 

Each button then gets a script that changes the value when the button is pressed. For the display of buildings, such a script looks like this:

If [ DoortTwenty::Buildings = 1 ] 
	Set Variable [ $buildings ; Value: 0 ] 
Else
	Set Variable [ $buildings ; Value: 1 ] 
End If
Set Field [ DoortTwenty::Buildings ; $buildings ] 
Set Variable [ $r ; Value: MBS( "MapView.SetShowsBuildings"; $$MapView; $buildings ) ] 

If the current value was 1, then the value of the variable is set to 0 and if it was not 1, then the value of the variable is set to 0. The variable now contains the new value, which is saved once in the corresponding field and is then used to set the appropriate function.

The button has a conditional formatting that colors the button green if the value of the corresponding field is one. Here you can see what the map can look like when the options are switched on.

Plan a route

But we can not only display a map, we can also calculate routes. To do this, we first need our starting point and our destination point. For the starting point, you could also use CurrentLocation to determine your location, for example. You saw how this works in door 8 of this calendar. We can use the MapView.PlanRoute function to plan a route between the start and end points. In addition to these two parameters, we pass a mode to the function. This mode determines how we see our route on the map and what our return looks like. We can choose from various options and combine them by adding the values.

Value Description
1 show route on map
2 show alternative routes on the map
4 show start of route with a pin
8 show end of route with a pin
16 zoom map to show whole of the router
32 return result as JSON
64 include poly lines in JSON

In this example, we have decided that the individual route should be displayed on the map. This should have a start and an end pin and should be displayed as large as possible in the center of the map. We would like to have the result for this route as JSON, because the JSON also provides us with some information that we will take a closer look at in a moment.

In the function we can also specify optional additional parameters to determine the transport method for which the route should be calculated. In addition, we can specify the names for the destination and start pin and also select the color of the two pins.

Set Variable [ $JSON ; Value: MBS( "MapView.PlanRoute"; $$MapView; DoortTwenty::Start; DoortTwenty::Target; 1+4+8+16+32 ; 1 ) ]

We now receive a JSON as a return that we can continue to work with. This contains some information. Here you can see such a JSON. We have shortened the JSON in the route instructions.

{
  "routes" : [
    {
      "distance" : 39063,
      "steps" : [
        {
          "notice" : null,
          "distance" : 0,
          "instructions" : null,
          "distanceText" : "0 m",
          "transportType" : 1
        },
        {
          "notice" : null,
          "distance" : 213.63,
          "instructions" : "Turn left onto Benrather Straße",
          "distanceText" : "200 m",
          "transportType" : 1
        },
        {
          "notice" : null,
          "distance" : 249.81999999999999,
          "instructions" : "Turn right onto Kasernenstraße",
          "distanceText" : "250 m",
          "transportType" : 1
        },
		…
        {
          "notice" : null,
          "distance" : 186.06,
          "instructions" : "Arrive at the destination",
          "distanceText" : "200 m",
          "transportType" : 1
        }
      ],
      "advisoryNotices" : [
        "Düsseldorf, DE, This zone comprises most major roads entering the city. Nevertheless, 
         the driving restriction does not apply to highways, thus an emissions stickers is not required 
         on the A44 north of the city and on the A46 south of the city.",
        "Cologne, DE, The zone covers a large part of the city of Cologne, 
         it extends beyond the city centre and affects both the east and west side of the Rhine.",
        "Directions begin at closest open road."
      ],
      "expectedTravelTime" : 3539,
      "distanceText" : "39 km",
      "name" : "A57",
      "transportType" : 1
    }
  ],
  "source" : {
    "ISOcountryCode" : "DE",
    "subThoroughfare" : null,
    "areasOfInterest" : null,
    "subLocality" : null,
    "administrativeArea" : "North Rhine-Westphalia",
    "country" : "Germany",
    "thoroughfare" : null,
    "ocean" : null,
    "latitude" : 51.225863400000001,
    "name" : "Düsseldorf",
    "altitude" : 0,
    "timeZone" : "CET",
    "longitude" : 6.7722986000000001,
    "postalCode" : null,
    "inlandWater" : null,
    "locality" : "Düsseldorf",
    "subAdministrativeArea" : "Düsseldorf"
  },
  "destination" : {
    "ISOcountryCode" : "DE",
    "subThoroughfare" : null,
    "areasOfInterest" : null,
    "subLocality" : null,
    "administrativeArea" : "North Rhine-Westphalia",
    "country" : "Germany",
    "thoroughfare" : null,
    "ocean" : null,
    "latitude" : 50.937522899999998,
    "name" : "Cologne",
    "altitude" : 0,
    "timeZone" : "CET",
    "longitude" : 6.9594800000000001,
    "postalCode" : null,
    "inlandWater" : null,
    "locality" : "Cologne",
    "subAdministrativeArea" : "Cologne"
  }
}

Now we can use JSON functions to read out the required data. In our case, this is the travel time, which we get in seconds and then have to divide this by 60 again to get the travel time in minutes.

Set Variable [ $time ; Value: JSONGetElement ($JSON ; "routes.[0].expectedTravelTime" ) ] 
Set Variable [ $time ; Value: Int ( $time/60) ] 
Set Field [ DoortTwenty::Time ; $time & " minutes" ] 

We also want to read out the route instructions. To do this, we first determine how many instructions are in the array and then go through them in a loop and put the instruction together with the distance information. Finally, we write the combined text into the appropriate field.

Set Variable [ $routeArray ; Value: JSONGetElement ( $JSON; "routes.[0].steps" ) ] 
Set Variable [ $count ; Value: MBS( "JSON.GetArraySize"; $RouteArray  ) ] 
Set Variable [ $i ; Value: 1 ] 
Set Variable [ $text ; Value: "Start: " & DoortTwenty::Start ] 
Loop
	Set Variable [ $inst ; Value: JSONGetElement ( $JSON ; "routes.[0].steps.["& $i &"].instructions" ) & 
		" in " & JSONGetElement ( $JSON ; "routes.[0].steps.["& $i &"].distanceText" ) ] 
	Set Variable [ $Text ; Value: $text & "¶¶" & $inst ] 
	Exit Loop If [ $i ≥ $count-1 ] 
	Set Variable [ $i ; Value: $i+1 ] 
End Loop
Set Variable [ $text ; Value: $text & "¶¶You have reached your destination: " & DoortTwenty::Target ] 
Set Field [ DoortTwenty::Route ; $text ] 

If we experiment with different start and destination locations, we see that the old routes and pins remain on the map. To avoid this, we remove the pins with MapView.RemoveAnnotations and the routes with MapView.RemoveOverlays when starting the route planning script.

Set Variable [ $r ; Value: MBS( "MapView.RemoveAnnotations"; $$MapView ) ] 
Set Variable [ $r ; Value: MBS( "MapView.RemoveOverlays"; $$MapView ) ] 
...

When we are finished and want to hide the map again, we call the MapView.ReleaseAll function. This and much more awaits you in the MapView component.

Then I hope that Santa Claus has also installed the navigation system in his sleigh so that he can find you at Christmas.

Door 21 - SendMail

Fact of the day
The first e-mail as we know it today was sent by Ray Tomlinson in 1971.

Did you know that you can also use the MBS FileMaker Plugin to create mails according to your wishes and send them to one or more people? I will show you how this works in today's door.

First of all, we create all the fields we need in our project. Today we want to add a graphic header and footer to our email. We put the image files for each of these in a container. Then we need a field for the subject and a field for the recipient. In this example we only send the mail to one recipient, but I will explain how you can send the mail to other recipients. We also need a field for the mail text. We also want to send an attachment with the mail. We also need a container for this. In addition, we can now also create fields containing our data for the email layout. The layout can then look like this, for example:

Now we can write the script. First we convert the text we want to send by mail into HTML. For this we have the Text.TextToHTML function. The cool thing about this function is that we not only transfer the text into the HTML, but also the formatting of the text is transferred and thus an HTML with the matching styling tags is created.

# Read HTML Text from field
Set Variable [ $HTML ; Value: MBS( "Text.TextToHTML"; DoorTwentyOne::Text; 1) ] 

In the next step, we place a placeholder for the header in front of the HTML and append a placeholder for the footer at the end. We replace the strings $$Header$$ and $$Footer$$ in a moment. Then we build the rest of the HTML structure around it.

Set Variable [ $HTML ; Value: "$$Header$$" & $HTML & "$$Footer$$" ] 
Set Variable [ $HTML ; Value: "<html><body>" & $HTML & "</body></html>" ] 

We then replace the header and footer with an img tag that refers to an attached image in our mail. With the cid in front of the image name we say that we want to attach the image and also integrate and display it in the mail. We will come to the attaching of these images in a moment. For now, we'll just create the template for the images.

Set Variable [ $HTML ; Value: Substitute ($HTML; "$$Header$$"; "<img src=\"cid:Header.png\">") ] 
Set Variable [ $HTML ; Value: Substitute ($HTML; "$$Footer$$"; "<img src=\"cid:Footer.jpg\">") ] 

There is a bit more to a mail than just the content HTML, which is why we create a mail in the working memory. With the reference as a parameter in other functions, we can then set further information for this mail.

Set Variable [ $Mail ; Value: MBS("SendMail.CreateEmail") ]

In order to be able to send the email, we need a valid mail account for which we have to enter information. We need the user name (SendMail.SetSMTPUserName), which is usually also the mail address, the password (SendMail.SetSMTPPassword) for the account, as well as the SMTP outgoing server ("SendMail.SetSMTPServer). In the SendMail.SetSMTPServer function we can also specify whether we want to use TLS encryption. This is what we want in our example and for this reason we specify 1 in the parameters.

Set Variable [ $r ; Value: MBS( "SendMail.SetSMTPUserName"; $Mail; DoorTwentyOne::UserName ) ] 
Set Variable [ $r ; Value: MBS( "SendMail.SetSMTPPassword"; $Mail; DoorTwentyOne::Password ) ] 
Set Variable [ $r ; Value: MBS( "SendMail.SetSMTPServer"; $Mail; DoorTwentyOne::SSLServer ; 1 ) ] 

Now we can set the individual information for the email itself. For example, we set the recipient of the email with SendMail.AddTo. In addition to this one recipient that we use here in the example, you can, for example, also loop through data records in a relational table and use this function in each loop call to add another recipient. But you can not only add standard recipients, you also have other functions for other types of recipients. You can add recipients in the CC with the SendMail.AddCC function or in the BCC with SendMail.AddBCC. If you would like to use different types in this loop, you can use the SendMail.AddRecipient function. Here you simply enter the recipient type as an additional parameter. You can choose between the types TO, BCC, CC or ReplyTo.

Now, of course, we also want to determine the content of the mail. With SendMail.SetSubject we specify the subject for the e-mail. We can also set the HTML text that we have already put together. To do this we use the SendMail.SetHTMLText function.

# Recipient
Set Variable [ $r ; Value: MBS( "SendMail.AddTo"; $Mail; DoorTwentyOne::Recipient ) ] 
# Subject
Set Variable [ $r ; Value: MBS( "SendMail.SetSubject"; $Mail; DoorTwentyOne::Subject ) ] 
# Content
Set Variable [ $r ; Value: MBS("SendMail.SetHTMLText"; $Mail; $HTML) ] 

Now we need to add our attachments. As already mentioned, we now also need to attach our inline graphics. To do this, we use the SendMail.AddAttachmentContainer function. In the parameters, we specify the mail reference and the container in which the image is currently located. We also enter the file name, the type and the InlineID that we have previously defined in the HTML.

Set Variable [ $r ; Value: MBS("SendMail.AddAttachmentContainer"; $Mail; DoorTwentyOne::Header; "Header.png"; "image/png"; "Header.png") ] 
Set Variable [ $r ; Value: MBS("SendMail.AddAttachmentContainer"; $Mail; DoorTwentyOne::Footer; "Footer.png"; "image/png"; "Footer.png") ] 

You can use the same function to attach normal attachments that are not displayed in the email. You do not need all the parameters here. The mail ID and the container in which the attachment is located are sufficient here.

Set Variable [ $r ; Value: MBS( "SendMail.AddAttachmentContainer"; $Mail; DoorTwentyOne::Attachment ) ] 

Now we have to create the CURL connection via which we want to send the mail. First we create a new CURL connection with CURL.New. With SendMail.PrepareCURL we then set the settings that we have already made for the mail in the CURL. We then use CURL.Perform to send the mail.

Set Variable [ $CURL ; Value: MBS("CURL.New") ] 
Set Variable [ $r ; Value: MBS("SendMail.PrepareCURL"; $Mail; $CURL) ] 
Set Variable [ $r ; Value: MBS("CURL.Perform"; $CURL) ] 

If we were able to send the mail, we receive an "OK" back from the function. If there was a problem with the connection, a text with an error number is returned instead of the OK. We have to be careful here. If there was an error during sending, we cannot intercept this with the MBS("IsError") function, because there was no error with the function but in the connection. For this reason, we must check here whether the function has returned OK and, if not, display an error message to inform the user.

If [ MBS("IsError") ] 
	Show Custom Dialog [ "Error" ; "An error occurred while sending the email" ] 
End If
If [ $r ≠ "OK" ] 
	Show Custom Dialog [ "Error" ; "An error occurred while sending the email:¶" & $r ] 
End If

This is what such an error message might look like. In this case, the corresponding sender address was written incorrectly.

Last but not least, we have to release the reference of the CURL connection and the reference to our mail.

Set Variable [ $r ; Value: MBS("CURL.Release"; $CURL) ] 
Set Variable [ $r ; Value: MBS("SendMail.Release"; $Mail) ] 

Now you can send your Christmas mail to your hearts desire. Have fun with it.

Door 22 - ListDialog

Fact of the day
Over the last few days we have become familiar with some dialogs that you can display with MBS. One that we were unable to present this Advent due to time constraints is the FileDialog. With this you can create a dialog to select a file.

Sometimes you want to be able to display a dialog from which the user can select one or more options. The ListDialog component allows you to do this. I will introduce this component to you in this door.

The ListDialog is again another dialog that is accessible across the entire solution. This means that I can set settings for this dialog in various scripts and these are then applied to the dialog. So we have to reset the settings of the dialog first if we want to create a new and fresh dialog. For this we have the function ListDialog.Reset.

Set Variable [ $r ; Value: MBS( "ListDialog.Reset" ) ] 

Now we can make settings for the dialog: First, we want a text to be displayed in the dialog. We set this with the ListDialog.SetPrompt function. We set the title for the dialog with ListDialog.SetWindowTitle.

The dialog can have up to 3 buttons. One button indicates a cancel button. Then we have a Select button, which confirms the entries in the dialog. The third button, which is not displayed by default, can be passed an expression with ListDialog.SetOtherButtonEvaluate, which is executed when the button is used. This button appears when we set the text of the button with ListDialog.SetOtherButtonLabel. In our case, we do not need this. We can also change the other two buttons with the functions ListDialog.SetCancelButtonLabel and ListDialog.SetSelectButtonLabel.

Set Variable [ $r ; Value: MBS( "ListDialog.SetPrompt"; "Please make your selection") ] 
Set Variable [ $r ; Value: MBS( "ListDialog.SetWindowTitle"; "Door 22" ) ] 
Set Variable [ $r ; Value: MBS("ListDialog.SetSelectButtonLabel"; "My Presents") ]

If we now create a very long list in this dialog, then it can happen that this list quickly becomes confusing. How good it is that you can display a filter above the list with which you can limit the list. To show or hide the filter, use the ListDialog.SetShowsFilter function and pass a 1 in the parameters to show or a 0 to hide. If you already want to display a filter in the field in the beginning, you can specify this with ListDialog.SetFilter.

Set Variable [ $r ; Value: MBS("ListDialog.SetShowsFilter" ; 1) ] 

As of this year, you can also use checkboxes for multiple selections in the list dialog. To display the checkboxes, we use the ListDialog.SetShowCheckboxes function. We can then use these in the dialog. If we have checked several checkboxes and then use a filter, the already selected checkboxes remain active even though they are no longer displayed by the filter.

Set Variable [ $r ; Value: MBS("ListDialog.SetShowCheckboxes"; 1) ] 

Now, of course, we have to fill the list dialog with entries. The entry can consist of up to 5 columns in total. How many columns we see depends on the value set in the ListDialog.SetColumnCount function. By default this value is 1. With the function ListDialog.AddItemToList we can add a single item to the list. If we have an entry with more than one column, we must separate the individual columns with a Char(9) character. In addition to the visible entries in the columns, we can also specify a tag for each column. This is not displayed, but can be queried later.

Set Variable [ $r ; Value: MBS("ListDialog.SetColumnCount"; 5) ] 
Set Variable [ $r ; Value: MBS("ListDialog.AddItemToList"; "1st Column" & Char(9) & "2nd Column" 
   & Char(9) & "3rd Column" & Char(9) & "4th Column" & Char(9) & "5th Column"; "Tag123") ] 


We can also specify in the Optional whether the entry is a header. A header delimits an area and looks a little different. Here, for example, you can see the header: Fruit. A header can also not be selected.

With the ListDialog.AddItemToList function, we can only add single entries to the list. If we want to add several items to the list at the same time, we can use the ListDialog.AddItemsToList function. The entries are then transferred as a list. So we can first pass a list of titles to the function and also a list with the corresponding tags.

Set Variable [ $r ; Value: MBS( "ListDialog.AddItemToList"; "Hello" ; "Greetings" ) ] 
Set Variable [ $r ; Value: MBS( "ListDialog.AddItemToList"; "Good Morning" ; "Greetings" ) ] 
Set Variable [ $r ; Value: MBS( "ListDialog.AddItemToList"; "Banana" ; "Fruit" ) ] 
Set Variable [ $r ; Value: MBS( "ListDialog.AddItemToList"; "Orange" ; "Fruit" ) ] 
Set Variable [ $r ; Value: MBS( "ListDialog.AddItemsToList"; "Broccoli¶Apple¶GoodEvening"; "Vegetable¶Fruit¶Greetings") ] 

To display the dialog, we need to call the ListDialog.ShowDialog function. The dialog is hidden again by pressing one of the buttons on the dialog.

Set Variable [ $r ; Value: MBS("ListDialog.ShowDialog") ] 

Now, of course, we also want to know what has been selected in the dialog. We can query this with various functions. With the functions ListDialog.GetCheckedTitles and ListDialog.GetCheckedTags we get information about the lines that have been checked in the dialog. The two functions provide us with a list of either the titles that were selected with the checkbox or the tags.

Set Variable [ $CheckedTitles ; Value: MBS("ListDialog.GetCheckedTitles") ] 
Set Variable [ $CheckedTags ; Value: MBS("ListDialog.GetCheckedTags") ] 

With the functions ListDialog.GetSelectedTitle and ListDialog.GetSelectedTag we get two lists with the titles and tags of the rows that have been selected at the time of confirmation.

Set Variable [ $SelectedTitle ; Value: MBS("ListDialog.GetSelectedTitle") ] 
Set Variable [ $SelectedTag ; Value: MBS("ListDialog.GetSelectedTag") ] 

I hope you enjoyed this excursion into the world of list dialogs and that we'll see us again tomorrow in door 23.

Door 23 - MailParser

Fact of the day
With the MBS FileMaker Plugin you can not only analyze or send mails. You can also retrieve mails directly from your email account via CURL using an IMAP connection.

Our advent calendar is slowly coming to an end and so we have already reached door 23. In door 21 we saw how to send emails with inline graphics. Today we would like to look at how we can find out what is in an email if we only have the mail file. For this we have the component EmailParser.

The mail file can either be in a container, as a file on the hard disk or we have the source code of an email. In all cases, we can read the data from the mail with the MBS FileMaker Plugin. For each case we have a separate function that loads the mail into the working memory and returns the reference with which we can work. If we have a sourecode of the email we use the function EmailParser.Parse to parse the email. Do we have the mail as a file on the disk then we use the function EmailParser.ParseFile. In our example, we place the email file in a container. To parse this mail we use the function EmailParser.ParseContainer

Set Variable [ $Mail ; Value: MBS( "EmailParser.ParseContainer"; DoortTwentyThree::Mail ) ] 

Now, of course, we want to know where the mail comes from and whether it has been sent to other people. We have all this information available as addresses which we can read out using the EmailParser.Addressfunction by specifying the index. In order to know how many addresses are involved, we query this number with EmailParser.AddressCount. Now we can loop through the individual addresses. The loop starts at index zero and runs up to index $AdressCount-1. As we go through the addresses, we want to divide them into two groups. One group stands for the sender (Sender and From) and the other group for the different recipients (TO, CC and BCC). With the function EmailParser.Address we can query not only the address, but also the type and the name of the address. In the parameters of the function we first enter the mail reference and the address index. This is followed by the selector, in which we specify which information we want. You can choose from the following selectors: type, name or email. We want the email and also the type with which we can then assign the addresses to the correct group. Depending on which group the address belongs to, it will be appended to the text in the variable $From or $To.

Set Variable [ $AddressCount ; Value: MBS( "EmailParser.AddressCount"; $Mail ) ] 
Set Variable [ $AddressIndex ; Value: 0 ] 
Set Variable [ $From ; Value: "" ] 
Set Variable [ $To ; Value: "" ] 
Loop
	Set Variable [ $Address ; Value: MBS( "EmailParser.Address"; $Mail; $AddressIndex; "email" ) ] 
	Set Variable [ $AddressType ; Value: MBS( "EmailParser.Address"; $Mail; $AddressIndex; "type" ) ] 
	If [ $AddressType = "Sender"  or  $AddressType = "From" ] 
		Set Variable [ $From ; Value: $From  & $Address & "¶" ] 
	Else If [ $AddressType = "TO"  or  $AddressType = "CC" or $AddressType = "BCC" ] 
		Set Variable [ $To ; Value: $To  & $Address & "¶" ] 
	End If
	Set Variable [ $AddressIndex ; Value: $AddressIndex + 1 ] 
	Exit Loop If [ $AddressIndex  ≥ $AddressCount ] 
End Loop
Set Field [ DoortTwentyThree::To ; $To ] 
Set Field [ DoortTwentyThree::From ; $From ] 

It would also be good to know what the mail is about, so we read the subject with EmailParser.Subject.

Set Variable [ $Subject ; Value: MBS( "EmailParser.Subject"; $Mail ) ] 
Set Field [ DoortTwentyThree::Subject ; $Subject ]

We can also use the EmailParser.ReceiveDate and EmailParser.SentDate functions to get the send and receive dates.

Set Variable [ $RecDate ; Value: MBS( "EmailParser.ReceiveDate"; $Mail ) ] 
Set Field [ DoortTwentyThree::ReceiveDate ; $RecDate ] 
# 
Set Variable [ $SentDate ; Value: MBS( "EmailParser.SentDate"; $Mail ) ] 
Set Field [ DoortTwentyThree::SentDate ; $SentDate ] 

We can either query the content of the mail as plain text or we can directly retrieve the HTML in which the formatting can also be recognized. We can then also display this in a web viewer, for example.

Set Variable [ $PlainText ; Value: MBS( "EmailParser.PlainText"; $Mail ) ] 
Set Field [ DoortTwentyThree::PlainText ; $PlainText ] 

Set Variable [ $HTML ; Value: MBS( "EmailParser.HTMLText"; $Mail ) ] 
Set Field [ DoortTwentyThree::HTML ; $HTML ] 

Now only the attachments are missing. For the attachments, we differentiate between normal attachments and inline graphics. If we use the EmailParser.AttachmentCount function to determine the number of attachments, we only determine the number of standard attachments. As with the addresses, we also have the option of querying various values with the EmailParser.Attachment function. The selectors we can use here are Filename, MimeType, MimeVersion, ContentType, ContentTransferEncoding, ContentDisposition, ContentDescription, contentId, text or container. In our case, we only want a list of the filenames of the attachments.

Set Variable [ $AttachmentCount ; Value: MBS( "EmailParser.AttachmentCount"; $Mail ) ] 
Set Variable [ $AttachmentIndex ; Value: 0 ] 
Set Variable [ $FileNames ; Value: "" ] 
Loop
	Set Variable [ $AttachmentName ; Value: MBS( "EmailParser.Attachment"; $Mail; $AttachmentIndex; "Filename" ) ] 
	Set Variable [ $FileNames ; Value: $FileNames & $AttachmentName & "¶" ] 
	Set Variable [ $AttachmentIndex ; Value: $AttachmentIndex + 1 ] 
	Exit Loop If [ $AttachmentIndex  ≥ $AttachmentCount ] 
End Loop
Set Field [ DoortTwentyThree::Attatchments ; $FileNames ] 

If you want to write a email directly as a file, you can use the EmailParser.WriteAttachment function. This writes an attachment that is defined via the index to a storage location specified with a path.

Working with InlienAttachments is very similar to the standard attachment. We use the EmailParser.InlineCount function to determine the number of inline attachments and query the information in a loop with the EmailParser.Inline function. The already known selectors are also used here. We can then use the EmailParser.WriteInline function to write the inline graphic to a file again.

Set Variable [ $InlineCount ; Value: MBS( "EmailParser.InlineCount"; $Mail ) ] 
Set Variable [ $InlineIndex ; Value: 0 ] 
Set Variable [ $InlineFileNames ; Value: "" ] 
Loop
	Set Variable [ $InlineName ; Value: MBS( "EmailParser.Inline"; $Mail; $InlineIndex; "Filename" ) ] 
	Set Variable [ $InlineFileNames ; Value: $InlineFileNames & $InlineName & "¶" ] 
	Set Variable [ $InlineIndex ; Value: $InlineIndex + 1 ] 
	Exit Loop If [ $InlineIndex  ≥ $InlineCount ] 
End Loop
Set Field [ DoortTwentyThree::InlineGraphics ; $InlineFileNames ] 

When we have finished our work, we release the storage address for the email with EmailParser.Free.

Set Variable [ $r ; Value: MBS( "EmailParser.Free"; $Mail ) ] 

Have a look to see if Santa Claus has sent you an e-mail and analyze its content. I look forward to seeing you again tomorrow for the last door.

Door 24 - Goodies

Fact of the day
Did you know that we have over 2000 functions in the plugin that you can use without a license?

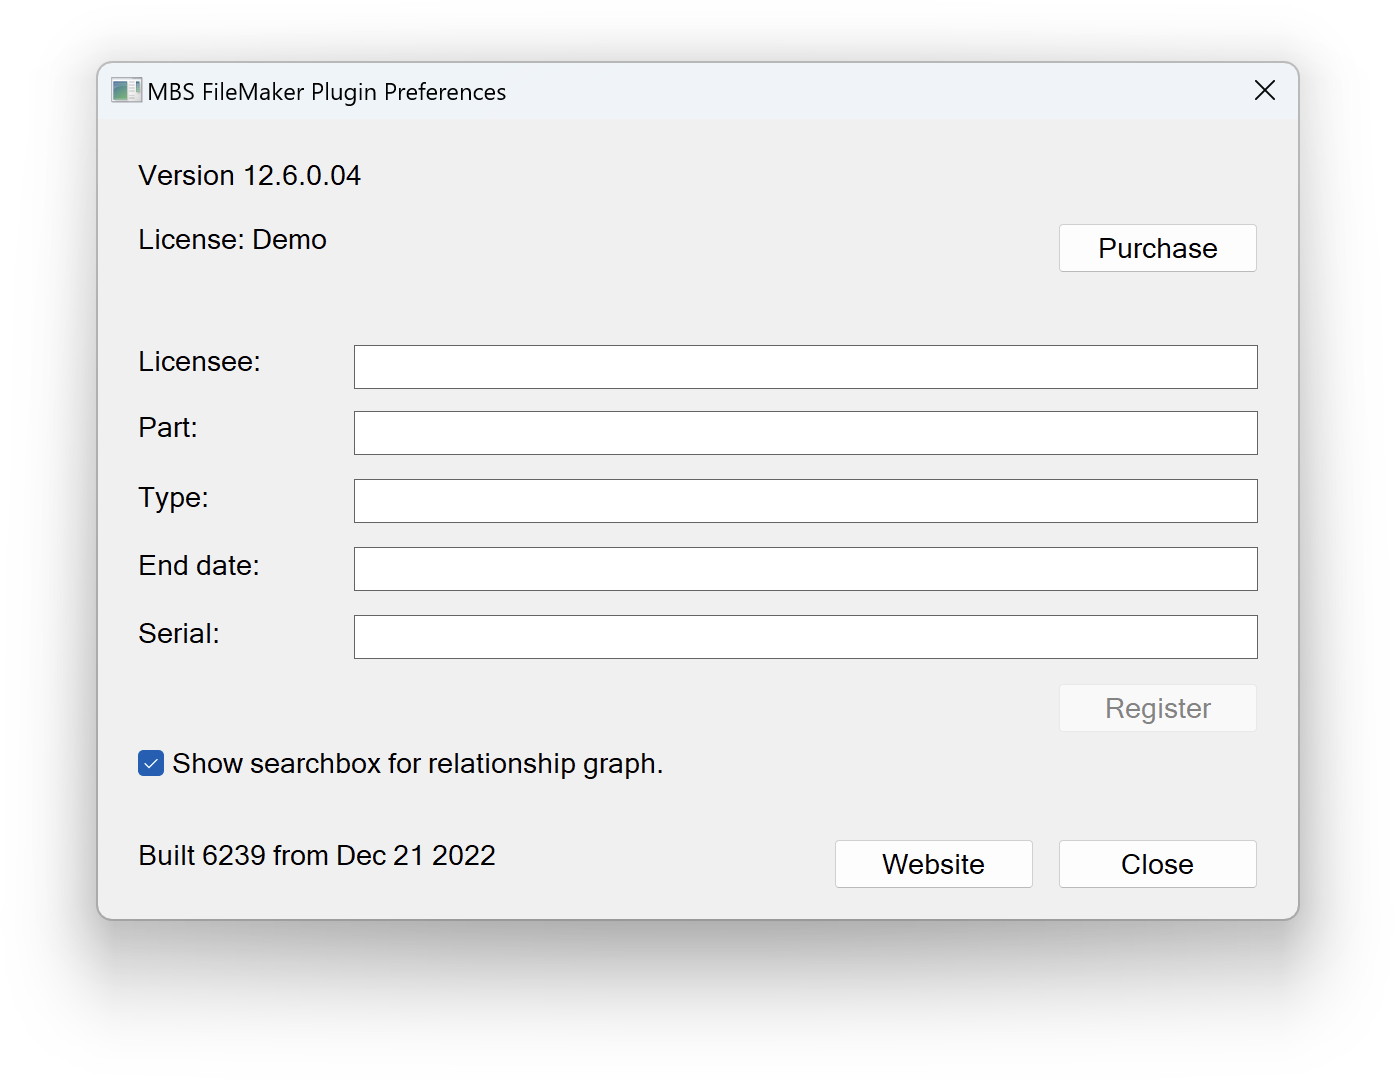
Today we come to the last door of our Advent calendar. I would like to introduce you to some of the free developer functions. MBS has been providing free functions for a number of years to make life easier for you as a developer. Unfortunately, most of these functions only work on the Mac. This is not because we wouldn't like to make the features available to Windows users, but because we don't have the access to Windows, so we can only offer most things on Mac. This year, we were able to make one function available to Windows users. So if you have installed the plugin on Windows and the function is activated, there is an input field with which you can search in the relationship graph.

If you want to use the functions, you need to download and install the MBS FileMaker Plugin and the functions you want to use have to be activated. To do this, you have a checkbox in the Windows preferences dialog that you need to check.

On Mac, this dialog is a little more extensive and you can make several selections. You will find the dialog under Settings -> Plug-Ins and then click on the MBS plug-in and click on the Configure button. You get this dialog, which lists the developer goodies. In this dialog you can activate and deactivate the functions with the checkboxes.

First, you can color your scripts and formulas. This helps you to keep a better overview and find errors more easily

In this image you can see, for example, that the Perform Script on Server script step has been highlighted in red because no script has been set. The Set Field script step is orange because we have not yet entered a field. The special thing about the colouring of scripts is that you can change the colors yourself using the fmSyntaxColorizer database, which is included with the plugin in the examples.

Color highlighting of matching brackets also helps you to find errors in your calculations more quickly. This can be a blessing, especially with nested calculations or SQL commands. Simply click on a square, curly or regular bracket and the matching bracket will turn blue.

You will also see a blue background if you click on the appropriate structures in loops or conditions. The structures matching the appropriate script step are then highlighted in blue. This helps to maintain an overview, especially with nested loops or conditions.

While we're on the subject of loops and conditions, I don't want to leave our codefolding unmentioned, because here you can temporarily collapse parts of the script so that you can keep the overview in large scripts. Codefolding has no influence on the execution of the various parts.

Do you sometimes find it difficult to remember a variable name that you have previously used in your script and now need in your calculation?

With the auto-completion of variables, this should now be easier for you. If you have previously used the variable in your script, you only need to enter the first few letters and you will be shown a list of variables from which you can select the correct one.

There is also a completion for the MBS function name to make your work even easier.

If you make a mistake when entering a variable, you will see a note in red in the line that the variable you are currently using in the calculation does not yet exist if the variable has not yet been set.

If you do not know where your error is in the script and you want to share the script but not the whole file in a forum, or you write an article about a cool thing in FileMaker, then you do not have to type the script by hand, instead you can copy the text to the clipboard by clicking on the Copy Script Text button at the top right of the Script Workspace, and you can use it from there.

Very close to this button there are three more buttons with minus and plus. These buttons can be used to enlarge the font in the script area. This is particularly useful for presentations or when you are looking at a screen with several people. If your eyes are not getting any better, you can also set a font size for script texts and formulas directly in the dialog in which you can also activate the goodies. And if you no longer like the font, you can also change it here.

When I write a script, sometimes after several days I don't remember why I wrote the script the way I did and didn't choose another way. That's why comments in a script are essential. With the MBS FileMaker Plugin, you now also have the option of using links in your comments, which you can send directly to a suitable website with one click.

Since 13.5 you even have the possibility to jump to a certain line or to the end or the beginning of your script by clicking on the comment. Here you can see such a comment.

# History on the bottom goto:end ➜🌎
# back to top: goto:start ➜🌎
# * added loop in line 15 goto:15 ➜🌎

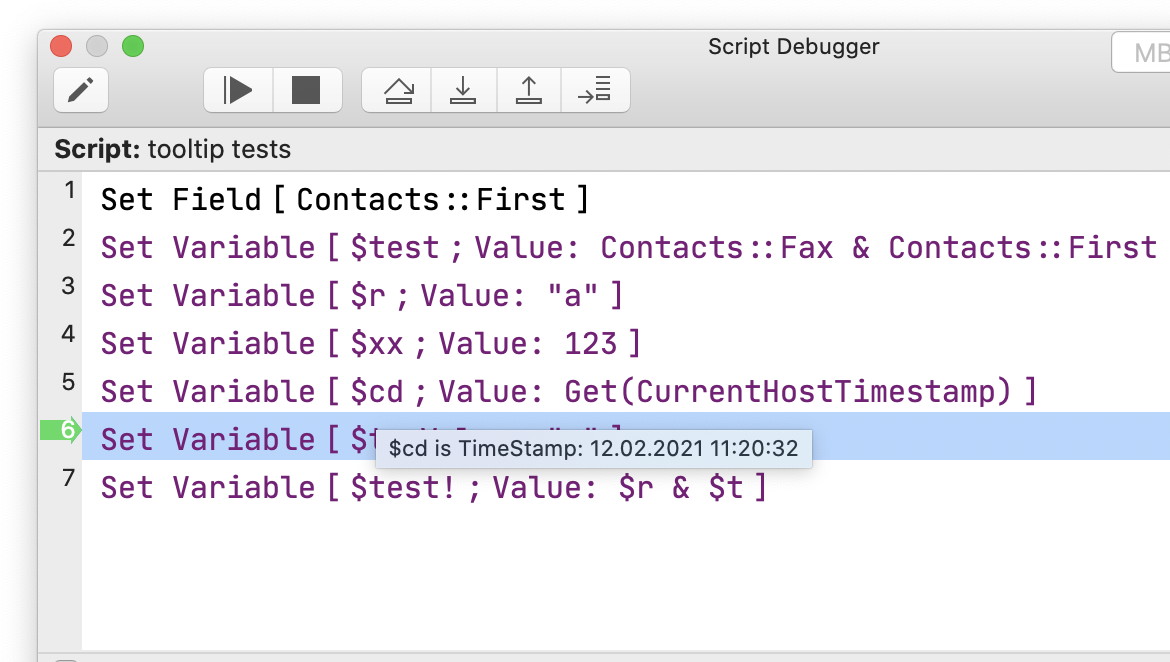
Another very useful function is Tooltips for Script Debugger. When using other development tools, we frequently have a feature to inspect values for variables or fields. Just move the mouse over the variable or field and see what's inside. This is very convenient for debugging a script to quickly see values, especially if all the local variables and object properties don't fit a single variable viewer window.

I hope you enjoyed the journey to our Developer Goodies. There are many more of these goodies. You can find a list and an even more detailed description of these goodies here.

I wish you lots of fun trying them out.

The MonkeyBread Software team wishes you a Merry Christmas.

Monkeybread Software Logo with Monkey with Santa hat
23 :point_left: 24 of 24

You can download the example file here: Advent2023.fmp12.